There’s something magical about a cookie that smells like celebration the moment it slides into the oven — warm cocoa, a hint of vanilla, and that faint tang that makes red velvet unforgettable. These Red Velvet Cake Mix Cookies are one of my all-time comfort-bake secrets: speedy, stunningly soft, and sprinkled with nostalgia. I can’t help but grin every time I press down the dough and watch the tiny scarlet domes form. If you adore fuss-free treats with a wow factor.
I first made these on a rainy afternoon when I was craving chocolate but didn’t want to fuss with layers or frosting. My kitchen smelled like childhood birthday parties and grandma’s cocoa—I baked and ate them warm, cheeks sticky from the frosting I couldn’t resist drizzling on top. My neighbor knocked with a plate the next day, eyes wide: “Do you have more?” That’s when these cookies became my go-to “cheer-up” gift. They’re quick enough for last-minute visitors and comforting enough to make a soggy day feel cozy.
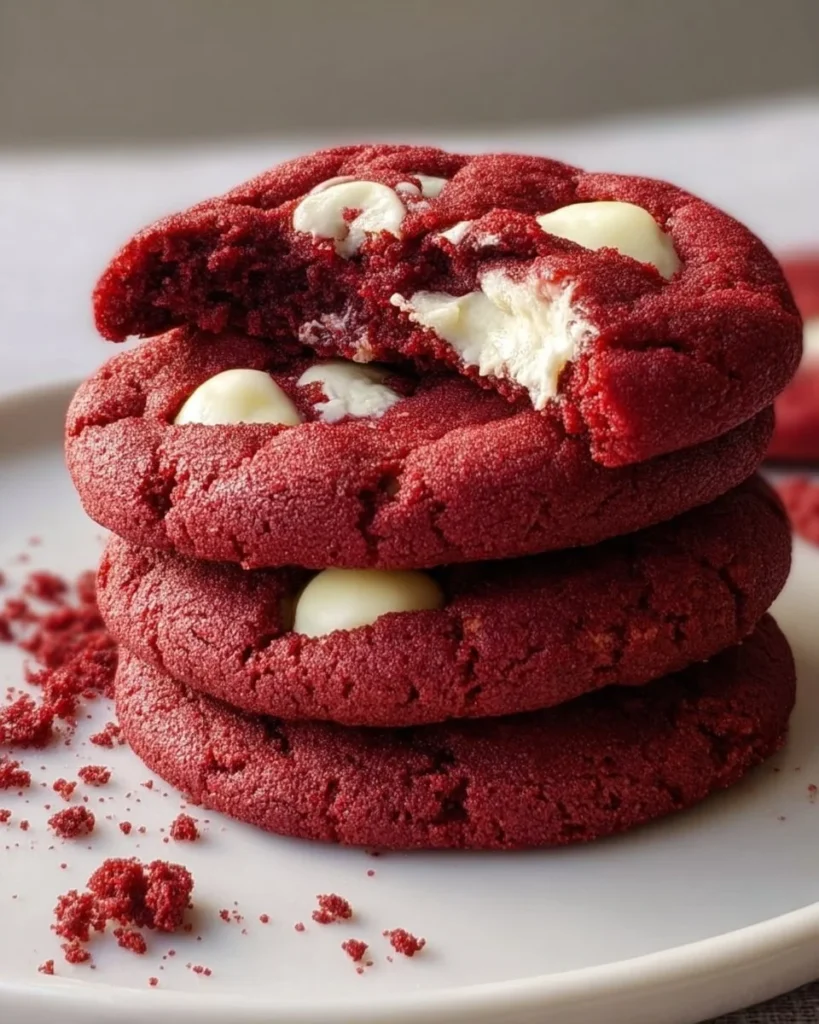
Ingredients Red Velvet Cake Mix Cookies
- 1 (15.25 oz) box red velvet cake mix (I use a classic brand — it gives reliable color and flavor)
- 2 large eggs (room temperature helps them mix more evenly)
- 1/2 cup vegetable oil (or light olive oil for a subtle fruity note)
- 1 teaspoon vanilla extract (optional, but it layers in warmth)
- 1 cup white chocolate chips or cream cheese chips (adds a creamy contrast)
- 1/2 cup chopped pecans or walnuts (optional, for crunch)
- 1/2 cup powdered sugar (for optional dusting or rolling) (gives a pretty, snowy finish)
- Pinch of salt (if your mix is on the sweeter side, this balances it) (tiny but mighty)
(Small notes: If you want extra tenderness, substitute 1/4 cup of oil with 1/4 cup sour cream — I’ll call that out in Tips too!)
How to Prepare Red Velvet Cake Mix Cookies
Break the instructions into three parts so nothing feels intimidating — you’ve got this!
Preheat & Prepare the Base
- Preheat the oven to 350°F (175°C). Line two baking sheets with parchment paper or a nonstick silicone mat (this prevents sticking and keeps bottoms soft).
- In a large bowl, whisk together the red velvet cake mix and a pinch of salt to aerate it — this gives a lighter crumb.
- Crack the eggs into a small bowl to check freshness and then add them to the dry mix. Add the oil and vanilla. Stir with a sturdy spoon or spatula until everything comes together into a slightly thick, glossy dough (it will smell faintly of cocoa and vanilla — irresistible!).
Make the Main Filling (texture & mix-ins) 4. Fold in the white chocolate chips and the nuts if using. Use a gentle folding motion so the dough stays tender; overmixing can make cookies cakier than soft. 5. If the dough feels too wet, pop it in the fridge for 10–15 minutes to firm slightly. If it’s too dry (rare with cake mix), add 1 teaspoon milk at a time until it just holds together.
Assemble and Chill/Bake 6. Use a cookie scoop (about 1.5 tablespoons) or a heaping tablespoon to portion dough into balls. For a pretty finish, roll each ball lightly in powdered sugar before placing on the sheet — it creates a delicate crackle when baked. 7. Place dough balls 2 inches apart; they’ll spread a touch and keep a soft, domed center. If you prefer flatter cookies, press lightly with the back of a spoon. 8. Bake 9–11 minutes until edges are set but centers still look slightly soft — remember residual heat finishes them. They should feel tender when you poke the center. 9. Let cookies rest on the baking sheet for 5 minutes, then transfer to a cooling rack. If you love contrast, drizzle a little melted white chocolate over warm cookies for a glossy finish.

Why You’ll Love This Recipe
- Speedy: From box to plate in under 30 minutes — perfect for spontaneous cravings.
- Reliable: Cake mix creates consistent flavor, color, and soft texture every time.
- Soft & tender: The inside stays pillowy while the exterior gets just a kiss of chew.
- Crowd-pleasing: The festive red color and white chocolate contrast are party-ready.
- Versatile: Add cream cheese chips, nuts, or a dusting of powdered sugar for endless variations.
- Minimal cleanup: One bowl is all you need — less time washing, more time savoring.
- Great for gifts: Stack in a mason jar or box, and they look darling with a ribbon.
- Adaptable: Gluten-free cake mixes work, and you can experiment with oil vs. butter.
Tips for Success
- Use room-temperature eggs for smoother incorporation and fluffier cookies.
- Don’t overmix: stir until just combined to avoid tough cookies.
- If you like a richer flavor, substitute half the oil with melted butter — it deepens the taste.
- Chill briefly if dough spreads too thin on your first tray; colder dough holds shape better.
- Use parchment or silicone; greasing pans can make cookies spread oddly.
- For uniform cookies, use a scoop and weigh dough balls if you’re baking for presentation.
- Swap white chocolate chips for cream cheese chips or mini semisweet chips for a twist.
- If using a gluten-free mix, check the package for binding agents; you might need an extra egg.
- For extra chewiness, bake at 350°F for a few minutes less and let cookies finish on the hot sheet.
Nutritional Information (estimated per cookie — makes about 24 cookies)
- Calories: ~150 kcal
- Total Fat: ~8.5 g
- Saturated Fat: ~3.5 g
- Carbohydrates: ~18 g
- Sugar: ~10 g
- Protein: ~1.5 g
- Fiber: ~0.5 g
- Sodium: ~140 mg
(These are rough estimates and will shift depending on mix brand, chip choice, and size of cookies.)
FAQ Red Velvet Cake Mix Cookies
Q1: Can I use butter instead of vegetable oil? A1: Yes! Swap equal amounts of melted butter for a richer, more golden flavor. Let it cool slightly before mixing so it doesn’t cook the eggs.
Q2: Can I add cream cheese frosting? A2: Absolutely. Pipe chilled cream cheese frosting onto cooled cookies or sandwich two cookies with a dollop for cookie “whoopie” sandwiches.
Q3: How do I make them less sweet? A3: Reduce chips by half and dust lightly with powdered sugar. You can also choose unsweetened nuts to offset sweetness.
Q4: Can I freeze the dough or baked cookies? A4: Yes — scoop dough onto a tray, freeze until firm, then transfer to a freezer bag for up to 3 months. Bake from frozen, adding a couple minutes to the bake time. Baked cookies freeze well too.
Q5: What equipment do I need? A5: Nothing fancy — a large bowl, spatula, cookie scoop or tablespoon, baking sheet, and parchment or silicone mat. A wire rack for cooling is helpful.
Storage Instructions
Store cooled cookies in an airtight container at room temperature for up to 4 days. Layer with parchment to prevent sticking. For longer storage, freeze baked cookies in a single layer until firm, then stack with parchment between layers in an airtight container for up to 3 months. Reheat in a 300°F oven for 5–8 minutes for that fresh-baked warmth, or microwave a single cookie for 10–12 seconds (watch closely so it doesn’t get rubbery).
Serving Suggestions
- Classic: Warm with a tall glass of cold milk — nostalgia in a sip.
- Fancy: Drizzle melted white chocolate and sprinkle edible glitter for festive occasions.
- Tangy contrast: Serve with a small spoonful of raspberry compote or a smear of cream cheese frosting to cut through sweetness.
- Coffee pairing: Rich espresso or a vanilla latte goes beautifully with red velvet’s cocoa notes.
- Ice cream sandwich: Press a small scoop of vanilla or mascarpone gelato between two cookies for a dreamy summer treat.
- Gift idea: Stack six in a small box with parchment and a ribbon; people love homemade with a pretty presentation.
If you try these, send a note about how they turned out — I live for the little kitchen triumphs and the stories that come with them!
Red Velvet Cake Mix Cookies
Ingredients
Method
- Preheat the oven to 350°F (175°C) and line two baking sheets with parchment paper or a silicone mat.
- In a large bowl, whisk together the red velvet cake mix and a pinch of salt.
- Crack the eggs into a small bowl to check freshness, then add them to the dry mix along with the oil and vanilla.
- Stir with a spoon or spatula until a thick, glossy dough forms.
- Fold in the white chocolate chips and nuts if using, being careful not to overmix.
- If the dough feels too wet, refrigerate for 10-15 minutes. If too dry, add milk a teaspoon at a time.
- Use a cookie scoop or tablespoon to portion dough into balls and roll in powdered sugar if desired.
- Place on the baking sheet 2 inches apart.
- Bake for 9-11 minutes until edges are set but centers look soft.
- Let cookies rest for 5 minutes on the baking sheet before transferring to a cooling rack.
- Optional: Drizzle melted white chocolate over warm cookies.